Showing posts with label garden. Show all posts

Saturday, December 1, 2012

Wrapping Up for the Cold

 
With the temperature dropping to below freezing over night, our fig finally dropped it's leaves, signalling the time to prepare it for winter.

After consulting online resources (thanks Youtube!), it seems that the US Thanksgiving weekend was, as predicted, the exact time of year that our tree was ready to get dressed for winter.

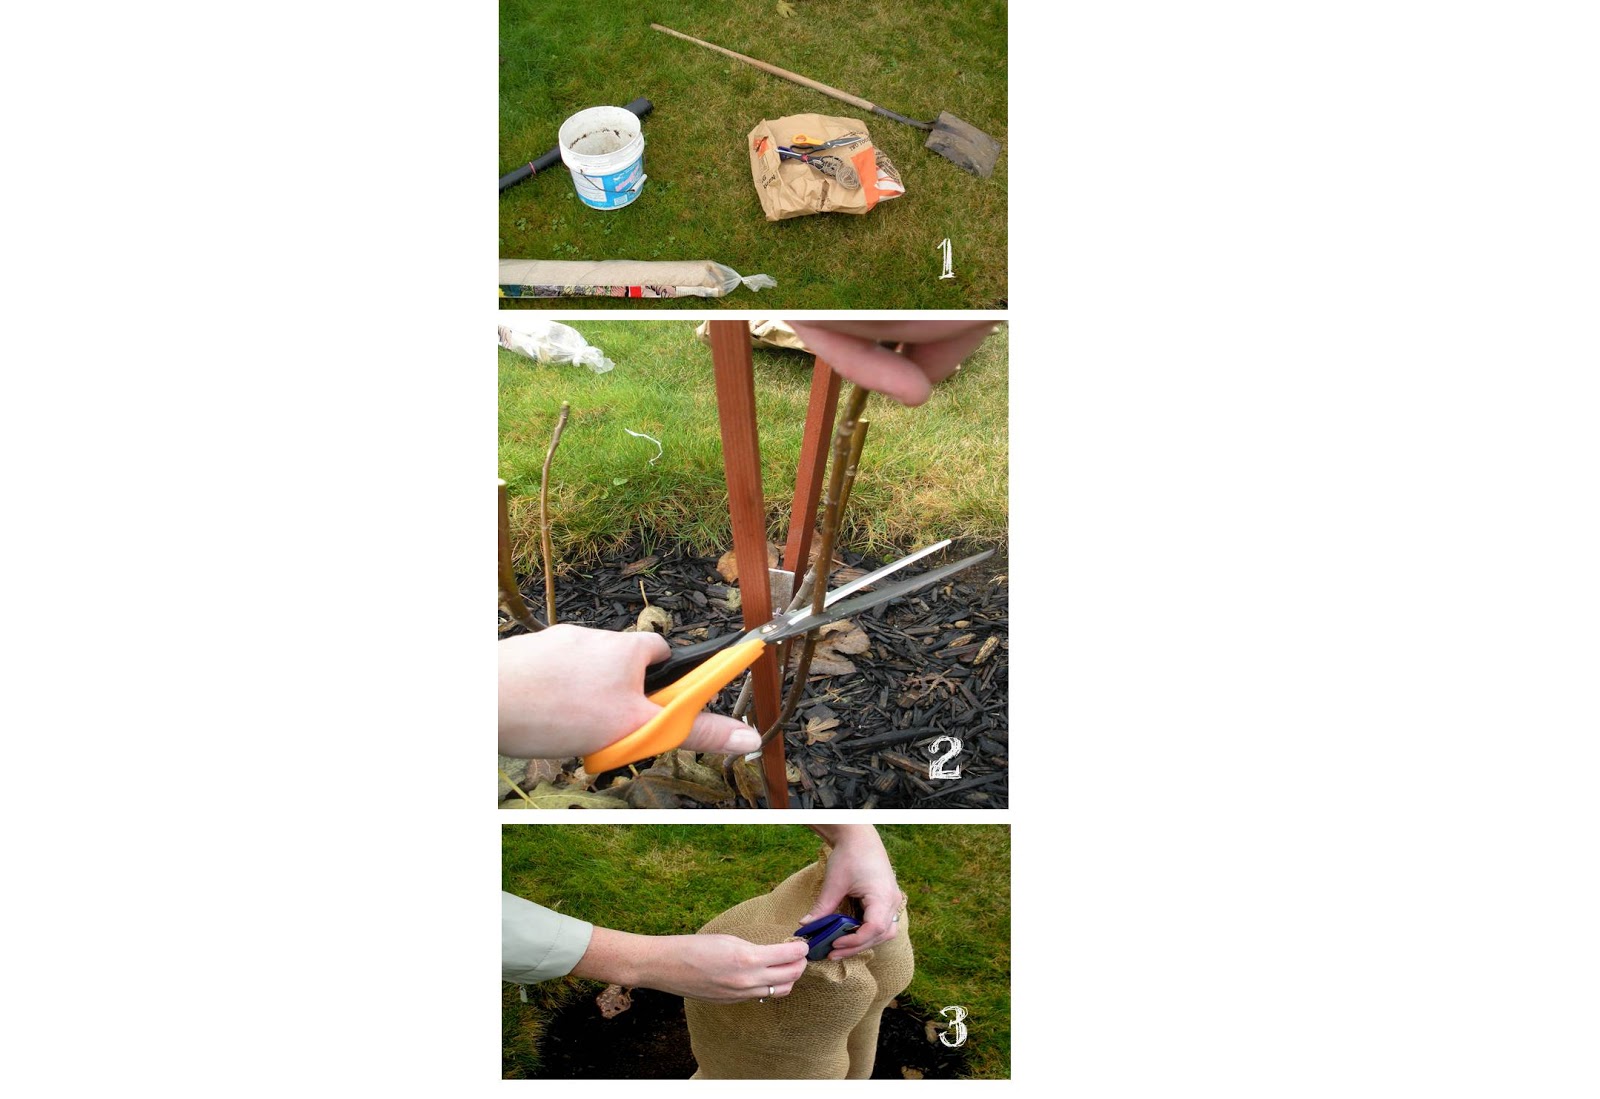
And, this is how we got 'er done:


1.  Gather Supplies:
  • shovel
  • paper garden waste bag
  • large bucket
  • twine
  • garden burlap
  • cardboard box
  • stapler
  • scissors
  • landscaping fabric
2.  Trim the branches down to encourage strong bushy growing habit (just above a bud on each stem)

3.  Wrap the tree in burlap and staple into place (careful not to staple the tree itself)

4.  Cover the tree in brown kraft paper (or, as our tree was so small, a paper garden waste bag)

5.  Cut the top off the paper bag

6.  Tie around the tree tightly with the twine

7.  Wrap a cardboard box tightly around the tree in a conical shape and tie in place with twine


8 & 9 .  Wrap a layer of landscape fabric around the tree, tie with twine and top with a large bucket (to prevent rain from getting in your tree's "cocoon".  Tuck the bark mulch up again the tree cocoon to prevent air/moisture getting in the bottom.

Et, voila!  20 minutes and the fig is dressed for winter.  Now, fingers crossed our system works and  she it survives ..... if not H might cry as he's been dreaming of home grown figs for years!

Tuesday, November 6, 2012

Putting Down Roots

With the garden makeover back in September we also did two other little additions to our garden.

1.  We finally put the wooden "round" that was living on the back deck as a rather precarious bird feeder to a more permanent use-- we figured the new tenant probably wouldn't want the thing in their space.  Partly inspired a random blog post on some random blog somewhere (helpful no?!) and revived by an episode of Design Star Season 7 and, I had the idea to add a bit of whimsy to our garden.

 
Since our round was too thin to make a side table from (as we don't have space for any more outdoor furniture), we went for something more ornamental.  With our 4 inch circle bit to make space for the plants, and a drill to make some drainage, we came up with this:


We raised it off the bark much with some flat rocks to help drain/avoid rotting, and nestled it in our front (south facing) flower bed under the 2nd storey's overhang. This area gets almost no water, so we figure that these succulents should do ok.  And the large wood "planter" adds some nice texture and interest, bonus!


A few months later and it is still going strong... We figure worst case, investing a few bucks in 2 new plants every year - or even harvesting some clippings from our other outdoor succulents means it's no biggie for some character and inhospitable space filling.


2.  We planted our fig tree.  Last summer we had visited the Okanagan with H's mom during her visit, and while at the Penticton Farmer's market we found some baby fig trees for sale by one of the farmers.  As a chef, H loves pretty much anything we can grow that is edible, so we picked one up.  You might have seen it peeking out from the pile of basement reno stuff stored in our living room in this post.


After staying in our living room for the year, it had gotten much bigger (like a gangly teenager!), and according to our research the summer/fall was the time to plant it.   So, a hole, some random bits of scrap wood, twist ties, and some of my trusty black bark mulch later, and we were good to go. 


When we the man folk cleared the tree out of our side yard, we weren't too worried about the exposure to the street, because we had plans to put the fig on that side of the house.  We pulled the fig forward on our lot so it is more in our front yard and had better sun access.  We figured that this way it will provide some visual interest without blocking too much light and  keep our side yard open and better for future little Waffles to play in.


For reference, the old tree was behind the low blue spruces in the middle ground of the above picture (lined up about smack dab in the center of the side of our house). The fig is pulled out into the front (unused) part of our lawn so takes up no play space and should be a nice visual from both the street and the house.


So far so good, it's too bad we will have to cut off most of the new growth before wrapping it up for winter..... H tells me I have to do it, as it'll hurt him too much to cut the limbs off himself. 

Friday, October 5, 2012

Deck Defeat

So I mentioned last week that before putting the suite on the market we did a little exterior beautification.  While the bark mulching of the flower beds was a big win, our attempt at tackling the back deck was a unfortunately a loss.

But first, let's backtrack a bit. When we bought the house, we inherited a perfectly good back deck. 


Having lived in the house for a year we realized that we almost never used that deck, preferring the deck on the front (sunnier south side) of the house, which leads straight off our living room.


Also realizing that the tenants bathroom and living room back right up to that other deck, meant we were even less likely to use the space moving forward (insert potty/peeping tom joke here!).


While structurally sound, the deck was not looking it's best.   The red itself was not my first choice of colours, but I could have lived with it.  But, the red finish was peeling off in spots and it left the deck looking pretty sad, dingy and dirty looking.

 
While strolling through Rona one Friday night (yup, we're that cool that we cruise the DIY stores Friday nights!), I spied an "Oops" can of dark grey/black opaque deck stain for $10 (please tell me I am not the only person who checks out that area every.time I am in the store, hoping for a jackpot colour?!), and thought bingo- good buy sad red deck!!
 
Later that weekend, we prepped the deck (sanded off any loose bit of old finish and debris) and cracked open the can of stain.  Unfortunately, about 10 minutes into the application process, H and I realized the error of my plan... 
 
 
The stain was absorbing and "working" on the raw wood, but not fully covering the red, resulting in a darker black tinted red deck.... Boo!  Two coats later it looks.... better (and our prospective tenants didn't seem to be bothered by it), but not what I had in mind.  I guess painting deck (with deck paint not stain!) is another thing to add to the To Do list for next spring!
 
 
So, I guess it's not really a defeat, but actually the loss of Round 1... here's hoping I can deliver the K.O. punch during Round 2 next year!

Friday, September 28, 2012

Little Black Dress

Okay, confession time....  H and I are rookie gardeners.  We have just wrapped up summer #2 in our house (we bought in June last year), and we are still winging it.

Some things that have not been helping us are:
  1. We bought the house as an estate sale, the previous owners being on older couple who hired their garden work out to pros! yeah no pressure!
  2. The children of the previous owners scalped our garden removing we estimate 10-15 mature plants/shrubs (yeah, nice huh!)
  3. We are on a corner lot with mucho exposure to the street (aka nowhere to hide)
  4. The most we have had to work with in the past was a planter or two
  5. We've been stuck doing our basement reno
With the basement reno coming to close, we realized that the first impressions of our house count a lot when trying to find a renter.  We figure that our house's exterior is a symbol of us, and a sign of how we treat our house and our things.  And that if we want a tenant who will take care of our/their space, then we need to show them we care.  There are a lot of outdoor makeover items on our to do list (like painting the house, new walkways, adding a new patio area with a trellis/awning...), but they are mostly too expensive or would take too much time/energy for us burnt out DIY-ers.  But, there was one 'quick and cheap fix we did decide to tackle......

Our flower beds.

Yup, that's right we whipped those suckers into shape.  From a distance they were not looking too bad....


Probably, helped by our new roof  and getting rid of the big cedars woopwoop!  But up close was another story....  neglect at weeding and general garden maintenance was showing.  It just looked sloppy and kinda uncared for.  Not the best impression to potential tenants as they walked up to our house.

So, we hunkered down and did a big weeding blitz. Which helped a lot, but was still not very polished or welcoming.


Yeah.... I wasn't kidding!  So, I got my thinking cap on... and I pondered our quick fix options.... and then I had a light bulb moment - bark mulch, but not just any bark mulch, ideally black bark mulch!

So I researched our options - from our local transfer station, Home depot, Rona, etc.... and the black stuff was expensive... and we needed a lot so there went the "cheap"check box....

But, I still pined for my black bark mulch.... I scouted it out everywhere we went gazing fondly at the bags every time we were at the home improvement stores... yup, you could say I lusted for it.  But, my frugal finger just couldn't pull the trigger.

That is until I spotted bags at Walmart for $2 per bag (vs $6+ per bag at the other stores), and they even had black- booyah!  So, I loaded up our Matrix with as many as I could fit, and dragged those suckers home to a sceptical husband.

A few trips later and he's sceptical no more... 'cuz now our flower beds look like this!


Crisp and clean, just the way I like it!  So far we bought 18 bags if bark mulch (we cleaned the Greater Vancouver stores out of their remaining stock!), so at $2 each, we spent under $40 with tax, and we were able to do about 1/2 of the flower beds on our whole property.

Guess who's going to be stalking the Walmart garden center next spring for her next fix?!

Monday, September 3, 2012

Doing it Like a Canadian

Question:  How to you know when your Belgian husband is acclimatizing to life in Canada??


When he starts acting like a lumberjack!

H got a new toy the other day, an electric chainsaw, and his excitement lead to this!  I didn't even get a chance to grab a "before", before H and my brother R started going chainsaw happy! 


It was a evergreen tree that had been pruned to death by the previous owners (like these, but into a ball shape, ooh la la!).  I wasn't a fan because it closed in our side yard and served no real aesthetic purpose (aka no pretty flowers or foliage), so I sure wasn't crying when H decided to take it down! 


Ahhh, so much bigger feeling!   The grass seed has been sown (a few months ago, shhh ) so the dirt patch is now green.  Don't worry, we have plans afoot for this side of our house, something that is much more "us"!

Tuesday, March 20, 2012

How Does your Garden Grow?

With winter finally deciding to ease up on us (well... since we had a bit of snow this morning, maybe it's just wishful thinking...?), my mind has started shifting to getting our outside space whipped into some semblance of shape. I've bee stalking the gardening section of our local library scouring books for inspiration. Part of my garden plan has been tracking down some ideas for modern trellising for the big blank side wall of our house.... and to be honest it's been pretty tough to find some nice contemporary clean lined but a bit ... different... designs.  The Ikea metal trellis we got for our Brussels apartment few years ago is still going strong, but is too small for the side our new house (if only I'd planned ahead and bought more when it was still available, curses!!).  It won't be going to waste, I already have plans for it!... but we need something bigger. 

I did have some luck tracking some excellent ( I think) inspiration, and I thought that some of you might me on a similar hunt, so here are my faves.


This sexy wall mounted steel number which comes in eight different colours and could add a great pop of colour to our forgotten side garden.  There's no info on price... so I'm guessing this is one of those "if you have to ask you can't afford" type scenarios!


source
This one be the same company as the one above, has a great sculptural feel and is modular which is a bonus.
source

I also found this more traditional, but way easier to DIY, wood and wire design by a local Vancouver garden designer.
source
And this Mondrian-esque (which we know I am a fan of) one which which even comes with how to instructions, including all the measurements!  It could easily be added upon over time if more trellis space is needed, and since it's pretty even without plants on it, I could see it painted a bright colour to make a real statement in the winter.

source
This honeycomb design comes in both both a wall mount and ground mounted version, I love the organic (and expandable/flexible) nature of it.

source
I have my fave, what about you?  Have you seen any other great modern/contemporary garden trellis designs out there? Please share

Thursday, December 1, 2011

Cedar you Later

Delayed Post: July 23 2011

With the purchase of our house, came three monoliths in our garden. And no, I don't mean three sleek black garden ornaments ala 2001 a Space Odyssey, though if they had come with a HAL-esque supercomputer that woulda been pretty cool! The monoliths that we got were three cedar monoliths that.are.huge!

As much as we love inheriting an established garden, those trees were just too established for our taste. at about 1.5 meters square they were big boys, and their placement on either side of the windows on our house, meant that we had a tunnel effect.


Yes, they are honkin' eh!  And oh wait, if we peek behind those rhododendrons and cedars.


Yup, there are more windows behind there!  Who'da thunk it! Even though we lucked out with ginormous windows both upstairs and down, the amount of light getting in was pretty minimal, meaning that downstairs the lights had to be on at any time of day in order to function in the space.E

I had casually mentioned to my parents and H that I'd love to get rid of them "one day" but having just used a huge amount of slave volunteer labour on our floors, I had resigned myself to tackle it next year. So, you can imagine my amazement when my Mom and Dad showed up at our place one weekend in July with a chainsaw in tow.

In a few short hours we made short work of those bad boys, and boy was it their time to go. They had been groomed within an inch of their poor little lives, so they were a dense nest of dead twigs with only a skin of green on the outside.


And boy do I love the result! Once we chopped those suckers down and re-located the out sized rhododendrons blocking the lower windows, and it's like our house can finally breathe. I can barely remember what the house was like with them.

Oh, and yes, the difference in the light levels in that side of the house is ah-mazing! We had seen the previous owners son a few weeks before when we had been painting and doing the floors, and he'd casually mentioned the "blue room" in the basement. It wasn't until after he'd left that H and I turned to each other and said "what blue room?". Well, we now know! The light coming in through the window had been reflecting off the cedars and rhodo which had made the bedroom downstairs appear green, and now that they are gone, presto.... it's light blue, no paintbrush required!

Oh yeah, you wouldn't have known it before, but we have house numbers and a front door light..... not pretty ones, but they are ours! 

The orange brick on the other hand, now that is pretty, I can't wait to really make a feature of it, I have plans a foot! (spoiler alert, I've started the entrance makeover and already it looks a million times better)

Sunday, May 10, 2009

That's Better

Happy Mother's Day everyone!!

We had a great day with H's family here in Brussels. it was a bit of a test for us as it was our first time entertaining for 8 in our apartment, but the great weather helped us a lot and I think it was a great success. We went for a wander around a HUUGE "rommel markt" basically the Belgian version of a garage sale around the corner from us-- think a street party complete with live bands strolling through the crowds and snack bars. We didn't stay too long as we had two little ones, but I would have loved to explore the 2+ km of stalls. one nice thing about Brussels is that these markets happen most weekends in the summer different areas so it is a great excuse to see different areas of the city.
After a stroll through the market, we went exploring in Woluwe Park, a great park which is just 10 minutes walk from our apartment so that the kids could be a bit more free, chasing ducks etc. and so we could show them all the lime green parrots that live there (apparently escaped former house pets who now have a colony of around 20 wild in the park).
In other news,... as you know, the grey trellis wasn't working for me..... so after a quick trip to the hardware store, and a sunny day to myself. I turned this (slightly better than the naked wall)....


Into this graphic gorgeousness! isn't it amazing what a little paint can do

Now our balcony is lookin' mighty fine if I do say so myself!

Monday, April 27, 2009

To spray or not to spray...

balcony before (the window to the left is our living room)

So this was the lovely view of one half of our balcony.... yeah- kinda blah, I thought so too! It's long and skinny (about 1m wide by 6m long). Now, I have my lovely new trellis all set up in our seating area (soon to be hammock area- lazy summer Sunday's here I come,woohoo!). I left it the original stainless steel colour to see it in situ before committing to painting because I am too impatient to wait until it is painted. But I still think I'm going to have to take it apart to spray it because I want it to have more impact.

balcony now

I know that eventually it will be hidden by the plant, but I don't want it blending into the wall the rest of the year. I am thinking charcoal or black to go with the planters and contrast with the blah colour of the wall (not sure what colour it is supposed to be- I call it "Pollution Grey")- or maybe something more punchy like red, hmmmm... gotta think about this a bit more. Normally I'd paint the wall it sits on, but as this is a rental apartment and we are hoping to move out of soon (into a place of our own, woohoo!), I can't be bothered.

Now I just have to convince H that we need to make yet another run to the hardware store for metal paint...
In more crafty news, the rest of the fabric for my zig zag quilt has arrived (and the mermaid fabric for Jack), so I'm off to make lots and lots of triangles! Will update soon.

Wednesday, April 22, 2009

Trellis me

So I kinda got the gardening bug recently - that nesting instinct I suppose. For our terrace I found this lovely trellis to help out our newly purchased climbing clematis, destined to hide an ugly concrete wall at the end of the terrace (and visible from our living room).
I love the clean lines and graphic shape (and how versatile it is so), totally my thing. I'm contemplating spray painting it black for an added graphic hit.

So after work tonight I'm off to my local Ikea (dangerously convenient to my office!) for a few sets of my trellis- and maybe a few swedish meatballs. *Sigh* now if only Ikea in Belgium did cinnamon buns like at home then it'd be the perfect evening ;)

Tuesday, April 21, 2009

Herb-a-licious

While I've been waiting for my latest fabric orders (I really need to work on my timing so I don't keep getting held up on projects like this!!). I have been busy prepping our terrace for summer. As we have gone from two households to one, we have a plethora (hey bro- I've had an excuse to use your favourite word!!) of big garden pots. So, in an effort to make our terrace an oasis in the city, I went our to the garden center with my MIL on the weekend to stock up on plants. In addition, I have been re-potting our little herb buddies- lookin' god guys!


(sorry for the bad lighting I finished putting these babies in their new little pots just in time for bed)

H doesn't give two hoots about the flowers etc, but he is very particular about anything that he can cook with. Hopefully our fully stocked herb pot, parked conveliently next to the kitchen, will keep the chef happy.


It currently contains:
  • chives
  • rosemary
  • mint and spearmint
  • curry
  • lavender (non edible but for garnishes (yes, he "garnishes" at home as well!)
Our two sorts of basil (regular, and Thai) and thyme that i've been growing from seeds will be added into our herb pot in a few weeks once they have gotten acclimatized to the outside temperatures.

Wednesday, March 4, 2009

Feeling Springy

According tht the package they shouldn't been sewn until mid March, but I just couldn't help myself. I guess I was hoping to help spring along. I just love keeping an eye on my little "babies" and watching them grow.

Now, as I am lucky enough to date an amazing chef, I get great home cooked food. To help H along, last year I started a small herb garden- even being so brave as to grow a few from seeds, and I loved it. So this year I dug out the seeds and am giving it another go, this time getting a bit more exotic. Not sure what Thai basil tastes like... Can't wait to see how they turn out :)