Showing posts with label quilt. Show all posts

Friday, September 6, 2013

Modern Quilting Bee- Family Style

With Baby V's impending arrival, I knew one of the things that I had to make was a quilt.  But what design?!  The result of a "probable girl" threw me an extra curve ball, as I essentially had to go gender neutral if I wanted it completed started before the baby arrived.    So... I procrastinated.  I poked around the Internet for some inspiration for which there were many ( like this, this), with the front runner being the Pow-Wow by Cluck Cluck Sew, but it still didn't have the "it factor" that I was looking for.

Inspiration finally struck back in May during H and my "babymoon" trip to Europe (yeah, oops, never blogged about that yet...).  While we were in the UK visiting my family my 97 year old Grandma A showed off a new project she'd been involved in- a English paper piecing quilt for charity.  After having fun chatting about fabric selection, hand sewing vs machine sewing etc. I didn't think much more about it after we left, but it was obviously brewing away in my head as a few days later the lightbulb went off and I formed a plan.   

My Mom can paper piece.... my Grandma can paper piece.... and H's mother can sew...... how about making Baby V's quilt a family project?!   I pitched the idea to the ladies on the family, and they were all game, success!  

So, I looked online for some English paper piecing patterns that were not the typical hexagonal flower as I wanted to stick to a gender neutral design, and I stumbled across the jewel star design - a bit different, but not too complex for the beginner/older sewer.  

from here
After a feasibility check with my mom to make sure I was not asking too much from the others, I did a few test runs to see how hard/easy the design was, and if I liked the finished look in reality.   And.... I did!


So I packaged up some instructions, paper templates, and pre-cut fabric and popped them in the mail to my Grandma, and dropped some more star "kits" off with my Mom.


And the virgin quilter, H's Mom, will be tackling her stars during her visit to Vancouver in October.  

I have to say these things are perfect for a summer quilting project as they are small and portable, and are easy to pick up and put down.... suntanning and quilting, now that's a relaxing summer!


Now to decide if I go with the diamond or hexagon white spacers.... which do you prefer?

layout images from here


Friday, February 25, 2011

Criss Cross

No, this isn't an ode to the musicians who brought "Jump" to the world... Well, technically I think they were Kriss Cross anyway, but whatever...

But alas, it is instead an ode to my latest quilt project, a baby quilt for my friend Sam's new little boy Evan. The blog has been pretty quiet recently, because I have been busy whipping all these little green scraps into....

You might recognize the block, it's a modified version of this block I made for one of my bees. I loved it when I made it last year and filed it away for a future project.

Thiis time I changed it up and did charcoal and green with a little bit of white for drama. Sam arrived last week for her one month visit from Ottawa, so I better put the pedel to the metal to get it done before they head home.

Tuesday, January 25, 2011

Going square-eyed

I know it's been a bit quite around here in the sewing department, but I have been sewing.... I've been working on my master plan. I laid out all of the blocks that I had (done by me and my Eurovision bee buddies), and plotted out how big I wanted the finished quilt to be. After some consulting with H, we decided that it should be big enough for the two of us to cuddle under on the sofa, and could be used on a bed if desired. So, after doing my math based on the block sizes, I realized that a Queen sized quilt was the answer.... gulp! So, I counted up my blocks and realized I was 15 blocks short.

I've found it easiest/quickest, to plan them out in advance so I can cut all the pieces out in advance and then just stitch them together. This way I can get quite a little factory line going of chain pieces bits.

I still have a few blocks to go, and the sashing is on order (Kona Charcoal from here), but already I am loving it. That is a big relief since the thing is gonna be huuuuge!


I've been pondering the quilting plan, and I'm idly pondering whether to hand quilt it... since the winter is almost over (well by the time the top is done the winter will be over!), and hand quilting in the summer is a bit nuts.... I'm wonder if machine quilting is the way to go.

Saturday, December 4, 2010

I'm Bent into shape

My first homemade xmas gift of 2010 is in the bag. My SIL's bento quilt is done! H's requested "sparkles" are sparkling, and I LOVE it!


Here she is in all her glory.... stars and squares. Or as I named it, Stars2 ...written like stars to the power of 2 (I don't think blogger does "powers").


I kept the quilting pretty simple, I figured the quilt had a lot going on it didn't need a super complicated quilting pattern.


And I think that I love the back as much as the front. The stars were planned due to a backing fabric shortage (which came from my stash woohoo!) and as a way to use up my red scraps... 9 stars later I don't see much of a dent, but oh well! Oh yeah, the new labels, loving them!

Now to wrap 'er up and stick 'er under the tree.

Sunday, November 28, 2010

A Badge of Honour

Labeling my quilts has always been a struggle for me. Making up a name for the quilts wasn't such an issue for me, but finding a simple but elegant and informative way to get the information onto the quilt proved my Achilles heel. In the past I've tried a few methods- hand embroidery and once machine embroidery when I was able to play with Dallas's crazy fancy machine. But neither of them really did it for me, because my hand embroidery skills are seriously sub-par, and my own machine doesn't have the skills to do machine embroidery...
With three quilts newly finished or almost finished, I knew I needed to find a better solution to my label issues. i knew I wanted something easy that I could do myself, because let's be honest, by the time I'm stitching the binding down on one project I've mentally already moved onto a new project! After doing some online investigations, I decided to use a modified version of this tute, a handwritten method I had heard about ages ago but never tried.
After some initial struggle with parchment paper and baking paper... FYI they don't stick to fabric when ironed... I re-read the instructions and headed down to my local grocery store to discover that Freezer Paper is actually a totally different product to the others I was attempting to work with, it is plastic on paper vs wax on paper... um yeah.


Because I wanted to use plain white fabric for my labels, and I didn't like how you saw a white"er" 1/4inch frame around it when you tuck under the edges to then blind stitch it down. Therefore, I modified the tute by adding a complementary border to the label piece - I just cut 1" strips and sewed them on like a log cabin block- ironing the seams away from the white fabric.

I then cut a piece of the border fabric the same size as my front piece and sewed them right sides together . A little snip into the backing fabric allowed me to turn the "block" right sides out, a little pressing and poking out the corners, et voila!


Noew to get them onto the quilts! (And yes, you read that right 2005-2010... my handmade smapler took 5 years to complete, I think the time taken is definitely worthy of a label in its own right!)

Wednesday, November 24, 2010

It's beginning to look a lot like christmas... presents!

As mentioned during my To Quilt list update, my bento quilt is almost done. Before leaving Belgium, I had the rough plan and a few draft blocks made, but then it's original intended recipient, wasn't too overwhelmed, so the project got shelved.

Then my blue loving SIL put in a request for a quilt, and since my brother and SIL have a Modern Asian kinda theme going on at their, I thought my forgotten Bento idea would be perfect. So, I dug out the few blocks I had made before, whipped out another bunch and badabing, hello lap quilt.

For the back, I had this super cute robin print fabric that I picked up last year during the boxing day sales. I didn't have quite enough of the bird print to do the whole back, and since I'm digging quilt backs with their own character these days, I decided to do some wonky red stars in a randomly staggered along a white strip.

I did realize a bit belatedly that my ingenious plan that would mean that I would have to deal with thread issues on the back. I wanted the stitches to blend in with the light blue background, but I didn't want blue threads to distract from the white and red stars strip. Therefore, I would have to partition off the quilt into two sections and use two different bobbin threads.


While one side of the star strip lined up perfectly with the edge of a bento square (as planned), I was not so lucky with the other side... it landed about 1/3 of the way through another bento box which meant that I couldn't run the whole way around the square with one bobbin thread. So, I came up with a plan, I basted along the offending star strip edge with bright pink thread, to delineate a clear dividing line.


This was I had a perfect line to use to keep track of where to stop and start the different backing threads.

While showing the almost finished quilt to H, he commented that he loved the sparkle on the backing fabric..... I was pretty confused since it is just a regular ol' piece of cotton. Then I realized that he meant the bobby pins holding the quilt sandwich together!!
After a little brainstorming... H suggested embroidering with silver thread (umm, he obviously has no idea about the poor state of my embroidery skills), and I suggested puffy paints, yup you read that right, puffy paint.
As a life long crafter, I had a stash of puffy paints from my teen days of decorating my own t-shirts (do you remember those days?!). After rummaging around in my closet, I found my old craft box, and low and behold.... my 10+ year old fabric puffy paints still work like a charm.
To test my theory, and select the right colour, I used some scraps of the backing, and had fun. After testing out a few options: silver- too dirty looking, silver sparkles- too bright and distracting, blue sparkles- totally wrong...

I finally found a winner... iridescent "crystal" sparkles. They give just enough sparkle, without distracting from the great fabric pattern, the perfect wintery touch (sorry for the bad pic!).

Instead of using the fabric paint in the traditional way which creates a real 3d texture, while I want the sparkle I want to keep the fabric feel, so I am planning to use my finger to almost finger paint the sparkles in the desired locations.

Now, to paint the back, bind it in red, and make a label...

Thursday, September 23, 2010

Catching up: Part 3

My sewing catch-up marathon continues... I was up to date with my Bee duties before leaving Belgium, but since arriving in Vancouver the blocks have been piling up. It seems that as soon as I get one done, a new package arrives!

This is part 2 of Carmen's tree request, this time pine trees in lime, simple raw edge applique


Then was Erin's block using her floral print and adding our own complementary fabrics and choosing our own design. I went with the classic Geese pinwheel design. It was a bit of a stretch for my stash, but I think it works.
And finally, last week was the September meeting for the Vancouver Modern Quilt Guild. Our challenge was to make a flying geese block in lime, aqua, teal, and navy with a plain white background, and make another block using the leftovers- it's crazy how many different designs you can make with little triangles. I went for a patched square look, I think it's be a great design for a full quilt.... maybe a rainbow of blocks?
Speaking of the VMQG meeting, I brought Jack along, he was very well behaved during "Show and Tell", good boy Jack!


Photo by the uber talented Sonja

Tuesday, August 3, 2010

Back to the beginning

ImPatiently waiting for our container to arrive has had a few advantages. One of which is that it has given me time to dig through the stuff that I stashed at my parents 5 years ago when I moved to Belgium.


Hidden amongst all my stuff was this little treasure...


My first ever quilt, finished in 2002 (man does that seem a life time ago!). Made by me based on a design I saw in a sewing book of my mom's it is full of beginner mistakes (choosing the wrong batting which 'beards' through the outer border) and shows my penchant for biting off more than I could chew (adding a border to the back because the fabric that I just "had" to use was to small on its own, and then attempted to line the back border up with the front border). I have many a fond memory of going step by step through the quilting process, even when my Mom and I had many a frustrated moment struggling to get the quilt through the sewing machine due to it's weight and thickness as I was trying to quilt it.


I am not sure if we were just uneducated on the options and tools available, or if back then quilting materials were not easily found. But, luckily my trials and tribulations with this imperfect work of art, did instill in me an interest in the art of quilting, and from there I took a sampler class to learn the correct techniques. From there, as they say, the rest is history. Although the perfectionist part of me longs to take it apart and to "fix" its imperfections, I have come to accept that they are a part of its charm.

Monday, May 24, 2010

Serendipity is....

Serendipity is pulling out your wonky letter blocks and finding out that you have exactly enough to border your double hourglass blocks in exactly the colours needed ...

Wednesday, May 19, 2010

One step too far?

Do you have those moments where you say to yourself you are nuts!...? As someone who is OCD ... a perfectionist detail orientated, I have them on a somewhat regular basis.

So, I'm putting it to you as a bit of a test. Do you notice anything off in this picture?......


It is driving me NUTS! Like I just stare at it and stare at it and I start to get hives kind of nuts. Am I the only one that has this reaction to this situation?

I've been considering unstiching it all so can seperate/replace the twin blocks so they aren't so in your face. But then I asked myself... will anyone else notice or is it the classic "you made it so you see the flaws" type of sitation?

So, did you notice my booboo? Do I give into temptation to re-do the layout or do I let it go?

Tuesday, May 18, 2010

Summer is coming!

With the weather finally warming up, and the big move almost here (1 week tomorrow and I'm back home!), the drive to make some forward movement on my WIP list continues.

There's something about having to pack things up and not having access to them for a weeks while they are in transit that makes me desperate to spend time with them... even though I havn't touched them in months!

So, since the last of the hourglass blocks arrived, I spent an evening sewing them all up.


I was originally thinking of doing a random layout, but I was worried it would end up too busy once the wonky word border is addded, so I decided to adjust my plan a bit.

With the quick addition of a few blocks my rainbow was born.... I love how the individual blocks shine (thanks MMSB ladies!), but there is still a bit of order and structure.


Yummy! Now, can I get the words finished before I have to pack everything up?...

Thursday, May 13, 2010

Trimming the fat

All 49 double hourglass blocks for my Picnic Quilt are finally finished, so tonight I squared them all up to 6.5"


It's a bit tedius- especially without a 6.5" square ruler!- but I actually find squaring up blocks quite therapudic. And the little pile of cast-aways....

a bit like fabric spaghetti (can you tell I live with a chef?!)


Yum, nice and bright and summery. Now it's time to sew them all together!

Wednesday, May 5, 2010

Not all snows are created equal

One of the other projects that I have to finish up is my Happy Hour/ Bubbles quilt.

I pulled it out of my WIP drawer (yes... I have a drawer of WIP's these days!), and decided to tackle the bubble layout. As the bubble blocks I recieved were all different sizes-- lesson learned, send backing fabrics in the same sizes or in a few standards that are easy to fit together, getting these all to fit was a real math test (and even after careful planning I still had to trim things down to fit, arg!).
Another thing that I did find out the hard way while building the bubble border was that Kona solids are not pantones.. nad thus each batch varies in colour. You can't really see it that well in ht picture above, but if you look carefully at the below picture you can see that the added piece is a bit more yellow-y white (hahah as they say back home, watch out for yellow snow!).


As I don't have any more of the original batch of Snow for the center panel and the outer border, I'll just have to live with it, but I did learn a valuable lesson- always buy enough solids for a project from a single batch- and keep it with the WIP until complete or you run the risk of the colours not matching.


I have one border to add on, but I'm hoping once I get it all together and quilted it won't be too obvious (I'll probably be the only one who notices, one of the downsides of making things yourself, you know all of the errors and oopsies!).

Sunday, May 2, 2010

Finally laid to rest

The second quilt I ever started was a sampler quilt, I had wanted to do some mother-daughter bonding and having successfully completed my first very simple quilt (I'll have to show you guys once I am back in Canada as it never made the trip over to Belgium), I wanted to move on to more complex designs... when you see that first quilt you'll know why.

The course was for hand sewing (yeah... don't ask me why we thought that was a good idea!), and each week we had a different block to complete. I was working full time and was a bit slow at keeping the momentum going once the course was finished- My Mom on the other hand had hers finished in less than 2 months!

Anyways, about 6 months after the top was complete, I decided to move to Belgium, and as I was by this point onto the hand quilting, it was (we thought) the perfect thing to keep me busy while I was in a new country aud un-employed, so I dragged it over in my suitcase.
And.. I worked on it for a bit, I put it away for a while... I worked on it a bit more, I put it away again... you get the picture! But, I am proud to say that after about 5 years, the hand quilting of this queen sized quilt is finally complete, and here she is in all her glory...

each block has a different quilting design, and the detail is probably what I am most proud of.
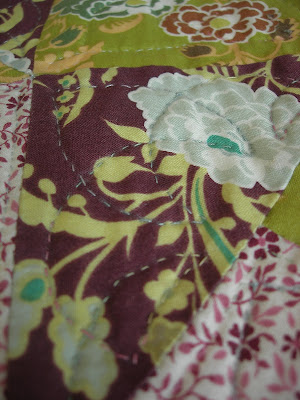


To be honest, I have been pretty over the front for a while... I'm not sure if it is more that I am sick of staring at it or if I have just moved on style wise (I think more the latter), but I do still love the backing fabric I chose, and old Amy Butler from her Temple Flower line, love it!


I still have to bind it- in the purple/fushia colour I think to work with both sides and to make the flowers on the back pop.

I'm a bit worried about washing this one as my hand sewing skills are a bit iffy, I have already had a few seams open in spots- I'm not sure if it is the pressure from the hand quilting frame or that my stitches were too big or my 1/4 seam allowances were off were the cause.... probably a combination of the three.

Now I can pack it away for it's trip back home, and I can cross one big WIP off my list.